5 Tips for Tasty Vegetables and an Umami-Laden Green Bean Recipe

Chase William Merritt Still Life with Vegetable
Vegetables were popular with 17th c. Baroque painters but alas, have yet to win over many kid-fans today  (Chase William Merritt, “Still Life with Vegetable”)

My earliest memory of eating vegetables involves my mother chasing me around the living room balancing a plateful of stir-fried spinach and rice in one hand, and desperately trying to shove dinner spoonful-by-spoonful past my uncooperative lips with the other.

I must admit I’ve come a long way since then. In fact, I even consider myself a flexitarian, preferring a larger portion of vegetables to meat (which, by the way, is the Asian way).

I’ve come to love previously abhorred greens such as ladies finger (okra), mustard cabbage, and choy sum (Chinese flowering cabbage). Even spinach, my childhood nemesis, tastes sweet on my adult tongue!

The trick, I’ve learned, is to select the freshest specimens you can find, and to cook the vegetables well. This means no wilty leaves, or brown, mushy spots on your bok choy. And heaven forbid you should overcook your broccoli! These tactics are even more important now that I have a child. As many a parent has come to realize, little people are the most persnickety of vegetable eaters.

I have some tips to offer any mom or spouse with a veggie-cynic on their hands, none of which involve hiding zucchini or Brussels sprouts (a technique I don’t quite approve of). However, I don’t disapprove of embellishing with ingredients that will make vegetables more palatable for naysayers big and small.

1. Roasting can make even the most banal of vegetables as addictive as candy (just think of the roasted kale chips craze). Roasting turns kale, cauliflower, broccoli crisp and crunchy and concentrates their sweetness through caramelization.

2. Pickling vegetables is another great way to get them to slide easily down your child’s throat. My son devours pickled cucumbers and carrots by the bushel.

3. Experiment with umami-laden ingredients like oyster sauce, soy sauce, fish sauce, miso, anchovies, and pickled veggies to amp up the flavor in a salad or stirfry. (My recipe below uses both soy sauce and pickled radish). And trust me, sambal terasi/belacan (shrimp paste and chilies) can transform ho-hum spinach into yum-yum!

salted radish
It comes in a big bag but preserved radish adds such a wonderful flavor and crunch. You’ll use it up in no time in pad Thai, omelets and numerous stirfries! Find it at Asian markets.

4. Toss vegetables like cauliflower, eggplant, okra into curry and they will soak up all that tasty goodness.

5. If all else fails, add bacon.

6. Oh, and here’s one more suggestion: buy Joe Yonan’s latest book, titled coincidentally, Eat Your Vegetables.

What’s your secret trick or dish that has been known to win over the most hardened of vegetable-haters? Please share below!

~~~

Haricots Verts with Preserved Radish

green beans with radish

Haricots verts and preserved radish are an unlikely combination but this dish is a hit with both my 3-year-old son and husband. Read: there are never any leftovers! I adapted this recipe from Steamy Kitchen’s green bean stir-fry recipe. On a whim, I used haricots verts, also called filet beans, the green bean’s slender French cousin (crikey, even their veggies are skinnier!). These beans are very tender and “beanier” in flavor when young but can turn tough if allowed to mature.

As for the preserved radish, you can buy either the sweet or salted kind at the Asian market—it will say on the bag. It doesn’t make too much of a difference as both are preserved with salt and sugar. I know it’s a big bag but you’ll use it up in no time in pad Thai, omelets and numerous stirfries! If you can’t find preserved salted radish, use more garlic or add some chopped shallots.

Time: 15 minutes
Makes: 4 to 6 servings as part of a multicourse, family meal

1 pound haricots verts, trimmed
1/8 cup preserved salted radish
1 tablespoon canola oil
2 cloves garlic, minced
2 teaspoons soy sauce
1/2 teaspoon sesame oil
1/8 teaspoon sugar

Bring a large pot of salted water to a boil. Add the haricots verts and parboil until crisp-tender, 4 to 5 minutes. (You can also microwave (3 to 4 minutes) or steam them for the same amount of time.) Don’t overcook as you will be stirfrying them later. Drain in a colander and rinse under cold running water.

While the beans are cooking, soak the preserved radish in a small bowl of water for a couple of minutes to get the excess salt off. Squeeze them dry then mince.

Swirl the oil into a large wok or skillet and heat over high heat until it starts to shimmer. Add the preserved radish and garlic and stir and cook until the garlic is fragrant, about 1 minute. Toss in the cooked haricots verts and drizzle with soy sauce and sesame oil. Sprinkle the sugar and stir and cook until the beans are coated with sauce and heated through. Serve immediately with hot cooked rice and/or a main dish.

~~~

This post is part of the monthly Let’s Lunch Twitter blogger potluck. This  month, we celebrate the launch of Washington Post food and travel editor, and fellow Let’s Luncher, Joe Yonan’s latest cookbook, Eat Your Vegetables: Bold Recipes for the Single Cook (Ten Speed Press, August 6, 20123). 

EatYourVegetablescover (1)

For more Let’s Lunch veggie-centric posts, follow #LetsLunch on Twitter or visit my fellow bloggers below: 

Annabelle‘s Farmer’s Market Gazpacho at Glass of Fancy

Cheryl‘s Egg-Drop Broccoli with Ginger-Miso Gravy at A Tiger in the Kitchen

Eleanor‘s Green Beans Two Ways at Wok Star

Grace‘s Vegetable Tempura at HapaMama

Jill‘s Fusilli with Corn Sauce at Eating My Words 

Joe‘s Guaca-Chi at Joe Yonan

Linda‘s Chocolate-Zucchini Twinkies at Free Range Cookies

Linda‘s Gateway Brussels Sprouts at Spicebox Travels

Lisa‘s Totally “Free” Veggie Soup at Monday Morning Cooking Club

Vivian‘s Kangkong (Water Spinach) with Fermented Beancurd, Chili and Garlic at Vivian Pei

~~~

What’s your secret trick or dish that has been known to win over the most hardened of vegetable-haters?

Choose Love … and a How-To for Vietnamese Fresh Spring Rolls


Romantic Heart form Love Seeds
Romantic Heart form Love Seeds (Photo credit: epSos.de)

Choose love.

These two simple words have been on my mind since they popped out at me from a friend’s Facebook post a few weeks ago. She was recapping her past year and she ended her reflection with “When in doubt, choose love.”

They could mean many things to many people, and I’ve been thinking about what it means for me to “choose love.”

2012 was a challenging year personally and love was often in short supply. Not that I wasn’t loved, but rather that I wasn’t a very loving person. I felt so drained I had no love to give.

I had to get used to the fact that my husband was 6,720 miles away and 12-1/2 hours ahead for an entire 12 months. And I worried (and still do) about his safety, every single day. Plus, I had to adjust to solo-parenting a toddler.

After a three-year hiatus, I worked very hard to develop a book proposal (one that I thought was very sellable and timely) that was quickly shot down. I have yet worked up the nerve to submit it elsewhere.

And I’m sure anyone who lives close to their parents can relate to the stress of having them live a stone’s throw away.

Did I mention I’m solo-parenting a toddler? I definitely have a newfound awe and admiration for single parents everywhere!

While I admit 2012 wasn’t all that bad—there was a trip to Vietnam to meet my husband, a paperback book launch–it was filled with plenty of angst and stress.

I realize now that many of these events and circumstances were beyond my control. Yet I was riddled with unnecessary anxiety and/or reacted negatively to them.

In hindsight, I can come up with any number of “what if?” scenarios.

What if I kept calm and didn’t raise my voice at Isaac when he wasn’t behaving the way I wanted him to? Then maybe I wouldn’t be wracked with guilt in the thereafter believing I was traumatizing my son and ruining him for life.

What if I listened patiently every time my dad complained about a new ache or pain, or expressed concern that his memory wasn’t as sharp as it used to be (aging has nothing to do with it, of course!). Instead, these could have been happy dad-and-daughter moments spent over a cup of coffee, especially if the topic at hand could be diverted.

If I had chosen love in these circumstances, perhaps I wouldn’t have expended superfluous time and energy getting worked up, upset, frustrated, etc., etc., you know what I mean. Thankfully, it’s never too late.

Today is only the 11th day of the new year but I’ve already savored the power of choosing love.

The other day, the cashier at Target had a face so sullen it rivaled Posh Spice’s– a.k.a. Victoria Beckham’s–perpetual pout (am I dating myself with this analogy?). Instead of condemning her off-putting attitude silently in my mind, I complimented her on her gorgeous red top out loud. That coaxed a smile out of both her and me.

When my toddler asks for one more book, yet another sip of water, anything he can think of, to put off going to bed, I take a deep breath, tuck his blanket under his chin and hold him till he falls fast asleep. This phase won’t last forever (I hope, gulp …).

I’m off to a good start, don’t you think?

Starting with this new year 2013, whatever the season, whatever the mood, always choose love.

~~~

Vietnamese Fresh Spring Rolls (Gỏi Cuốn)

all rolled up

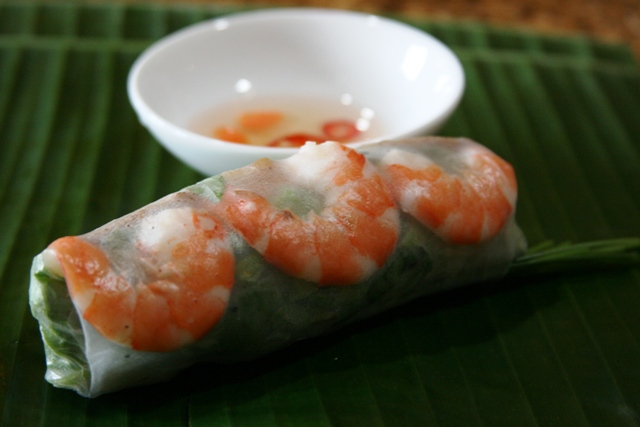
In line with our #LetsLunch theme of new beginnings and first times, I’m going to start a new column about trying dishes I didn’t think I could or would make at home. I’ve been told many times how easy it is to make these fresh rolls but I’ve always been intimidated by the rice paper wrappers. Most sources say to dip the dry rice paper rounds in water until soft but it seems impossible to get just right. While traveling in Vietnam, I learned two other methods of softening the rice paper: one is to wipe it with a wet, non-terry towel until pliable, and the second, use a spray bottle. The rest is easy. Well, the rolling does takes some practice but you’ll eventually get the hang of it. The following recipe/how-to is based on what I learned at a cooking class I took at the Morning Glory Cooking School in the beautiful town of Hoi An in central Vietnam.

Time: 45 minutes prep
Makes: 4 servings

8 sheets rice paper wrappers, plus more in case some break (8 to10-inches across is best)
Red leaf, romaine, or butter lettuce
3 cups fresh herbs: mint, cilantro, Thai (or regular) basil, red perilla, Vietnamese mint, rice paddy herb, bean sprouts (any combination of these is fine)
Carrot and daikon pickles
8 ounces small round rice noodles, cooked according to package directions (look for noodles labeled ‘bun,’ not the super thin vermicelli or bean thread noodles. If you have my cookbook, they are pictured as #1 on pg. 15)
8 small slices pork shoulder, cooked as desired (I like to use char siu, store-bought or home made)
12 large cooked shrimp, peeled and halved
12 (3-inch-length) pieces garlic chives
Dipping Sauce (see below)

Lay all the ingredients out on the table and let everyone make their own rolls.

Soften the rice paper using your method of choice:
1. Dip in a bowl of warm water for about 3-5 seconds (depending on its thickness).
2. Lay on a flat surface and wipe with a wet non-terry towel several times until pliable.
3. Fill a spray bottle with water and spray until pliable.
You want the rice paper to be just soft enough that you can fold it. You will lessen the risk of over-soaking your rice paper wrapper if you use the latter two methods but it is up to you.

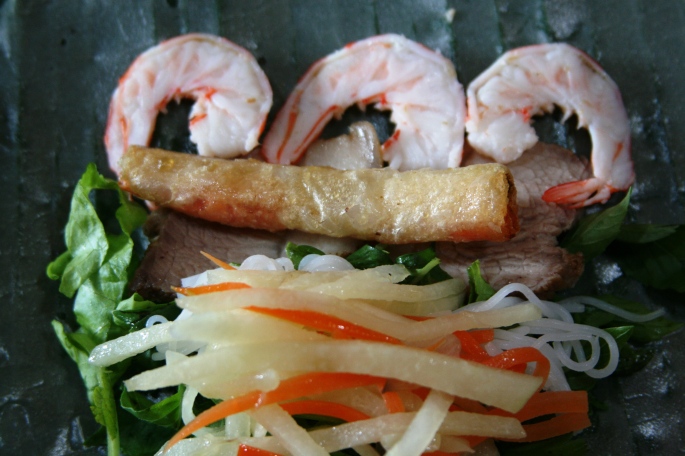
Place the wrapper on a work service (a flat plate works fine) and lay a piece of lettuce on the edge closest to you. Grab a handful of herbs and place them on top of the lettuce. Place a handful of noodles on top of the greens. Add some pickles. Arrange 2 slices of pork above the noodles, followed by 3 slices of shrimp, pink-side down.

layout
In case you were wondering, the surprise in the middle is a deep-fried rice paper roll (a tip I learned at the Morning Glory Cooking School). Adds a lovely crunch to it!

Fold the edge closest to you over the ingredients and start rolling, ensuring the roll is snug as you go. When you are about half-way, fold both sides in and  arrange three pieces of garlic chives on the right so that they jut out like palm leaves swaying in the wind. Continue rolling until you have a nice tight roll.

If you tear the rice paper, don’t fret, just start over again. And even if your roll isn’t perfect, so what, it’ll still taste good!

Serve with dipping sauce.

Dipping Sauce (Nước mắm chấm)

Makes: 4 servings

2 large cloves garlic, minced
1 to 2 Thai red chilies, or to taste, sliced
3 tablespoons sugar
3 tablespoons lime juice (from about 1 large lime)
2 tablespoons warm water

Combine all the ingredients in a small bowl and stir until all the sugar has dissolved.

~~~

This post is  part of #LetsLunch, our monthly Twitter-inspired food bloggers potluck. This month, it’s new beginnings and first times.

Don’t forget to check out the Let’s Lunchers’ creations below (the list will be constantly updated). And if you’d like to join Let’s Lunch, go to Twitter and post a message with the hashtag #LetsLunch.

Annabelle’s Brown Butter Creamed Greens at Glass of Fancy

Emma’s Gluten-free Pretzels at Dreaming of Pots and Pans

Grace’s Matcha Green Tea Yogurt at Hapa Mama

Jill’s Heavenly Angel Cake at Eating My Words

Lucy’s Mexican Hot Chocolate Cookies at A Cook and Her Books

Lisa’s Da Bombe Alaska at Monday Morning Cooking  Club

Linda‘s Trinidadian Black-eyed Peas  at Spicebox Travels

Nancie’s Vietnamese-style Chicken with Lemongrass at NancieMcDermott

Rashda’s Parathas at Hot Curries and Cold Beer 

Sonja’s Beetroot and Fetta Varenyky at Foodnutzz


A Multi-Culti Christmas and New Year To You!

I was about 14-years-old in this picture taken during a family celebration. You can see the tippity top of the nasi tumpeng in front of my parents. No one is smiling except my mum! Hmm… My excuse? I was a teenager!

When I was growing up, fragrant yellow coconut rice was right at home sitting next to the roast beef and/or honey-baked ham during Christmas dinner.

Every year, my mum would make nasi tumpeng, yellow coconut rice served with a smorgasbord of Indonesian dishes. Come to think of it, the roast beef and the Bûche de Noël were probably an afterthought!

Mum’s first task was to make rice imbued with the fragrance and flavor of coconut milk and turmeric (nasi kuning or yellow rice, my recipe here). She would then mound the rice into a cone atop a bed of banana leaves folded in an intricate pattern origami-style. This “mountain” represents the numerous mountains and volcanoes that dot the  thousands of islands that make up the Indonesian archipelago.

Around the base of the cone, Mum would arrange various foods that she’d prepared over the past week in neat piles: shredded egg omelet, ayam goreng, (fried chicken), empal (sweet and spicy fried beef), teri kacang (anchovy with peanuts), tempe orek (fried tempe), perkedel kentang (potato cutlets), and anything else that she fancied.

My mum recently made this nasi tumpeng for a friend's wedding
My mum recently made nasi tumpeng for a friend’s wedding

The cone mimics the holy mountain, once revered as the abode of ancestors and gods, and its height symbolizes the greatness of Allah. The rice’s golden hue symbolizes prosperity and wealth. The food at the base of the cone symbolizes nature’s abundance.

Traditionally, this feast was created in thanksgiving for an abundant harvest or a blessing that a family has received. Today, nasi tumpeng is still widely served to celebrate any special occasion, be it a birthday, a marriage, or even a successful business venture.

Without a doubt, nasi tumpeng fit perfectly into our holiday celebrations, a time of thanksgiving and hope for a prosperous New Year.

Buoyed by my own memories, I asked my friends if they had any fusion holiday traditions to share. They sure did!

Filipino

Large bibinka (bebinca).
Bibinka is a popular Christmas treat in the Philippines (Photo credit: Wikipedia)

According to Happy, Filipinos traditionally go to midnight mass on Christmas Eve. When they come out, the streets in the Philippines are usually lined with vendors selling tasty, freshly steamed treats. “People look forward to Christmas midnight mass because this is the only time the vendors sell these items this early in morning,” she says. The treats include “puto bongbong,” a purple rice flour treat steamed in a bamboo tube and served with shaved coconut; and “bibinka” is a rice flour and coconut milk treat, steamed in banana leaves and cooked in a clay pot.

“In America, it is common for families to continue cooking these treats during the holidays to remind them of the Philippines,” she explains.

Japanese

New Year's Dishes
A variety of Japanese New Year’s dishes (Photo credit: JanneM)

Hiroko spends two days preparing a traditional Japanese New Year’s Day feast for family and friends. “For New Year’s Day, each food has meaning… We always start with these three as the root,” she says, describing the following foods: “kuromame,” black beans, which represent the hardworking ethic of the Japanese people; “kazunoko,” salt-cured herring roe, the thousand eggs symbolizing a wish for a large and prosperous family, and “gomame,” a tiny fish that reflects growth and good luck.

Chinese

Sticky rice stuffing is a common dish served by Chinese Americans during Thanksgiving and Christmas

Every Christmas, Virginia’s family combines American traditions of turkey and ham along with their  family tradition, Chinese Sticky rice, at the dinner table. “Inside the sticky rice, my parents would add … Chinese sausage, shiitake mushrooms, and dried shrimp,” she says. “For us, sticky rice represents family unity and togetherness — which is especially important now that my siblings and I live in different parts of the country.”

“Sticky rice is something I look forward to every year!” she says. (Find my recipe here.)

Taiwanese

hot pot!
Assorted ingredients surround a hot pot waiting to be dipped into the soup (Photo credit: StudioGabe // Gabriel Li)

Tina, a Taiwanese who grew up in Guam, remembers spending New Year’s Day around a hot pot. “It brings the entire family together over one pot of boiling soup with a variety of ingredients,” she says. “Moreover, it’s a hot soup dish and simply appropriate for the cold winter.”

Indonesian

Chicken porridge, Jakarta, Indonesia
Indonesian bubur or congee or rice porridge (Photo credit: Wikipedia)

For Titania, congee and Chinese wine were staples to ring in the New Year when she was growing up in Indonesia. “We put preserved salty plum in the wine to create a unique salty and sour (from the wine) taste and we’d toast with that at midnight,” she says. “Then we would eat up the chicken and pork “bubur” (Indonesian-style congee) that my mom made to warm us up.”

By blending old and new, adding a dash of east meets west, plus a sprinkle of creativity, we can all design our own family traditions for the holidays. But regardless of what is served on the table or what gifts are under the tree, remember that being together as a family and sharing each other’s company should be number one on everyone’s wish list.

(These quotes were originally published in a 2007 Northwest Asian Weekly article)

Do you have a fusion holiday tradition to share?

~~~

This post is  part of #LetsLunch, our monthly Twitter-inspired food bloggers potluck. This month, it’s holiday celebrations around the world.

Don’t forget to check out the Let’s Lunchers’ creations below (the list will be constantly updated). And if you’d like to join Let’s Lunch, go to Twitter and post a message with the hashtag #LetsLunch.

 Annabelle’s Pecan Slices at Glass of Fancy

Emma’s Latkes at Dreaming of Pots and Pans

Grace’s Persimmon Salad at Hapa Mama

Lucy’s Ham and Cheddar Scones at A Cook and Her Books

Joe’s Orange Honey Cake

“Many Grandmas'” Asian Pickles

Left to right: Popo, my mum on her 16th birthday, and my mum’s cousin

One of the most common questions I get asked about my cookbook is: “Which one’s your grandma?”

My sad reply: “She’s not in there.”

I didn’t really know either of my grandmothers. My paternal grandmother, whom I called Oma, (I wrote about her in this post) lived in Indonesia while we were growing up in Singapore.

When I was little, Oma would stay with us for extended visits once in awhile and we would make the one-hour flight over to Jakarta once or twice a year. But the language barrier and her ailing health prevented us from developing a deeper relationship.

When I was 24, Oma passed away after being bedridden for many years. I only learned her name then: Sicilianti.

Popo was the maternal grandmother I never knew. As a matter of fact, I just found out that her name was Helli. Popo died of breast cancer when I was very young, before I could make any memories of her.

What I do know is that Popo was a fabulous cook and thankfully her culinary legacy lives on in my mother. However, when I asked my mother for a specific recipe for this post, she told me Popo cooked traditional Indonesian dishes but everything was kira kira, estimated, without ukuran, or measurements.

Over the years, I’ve envied my friends who had grandmothers who cooked for them, regaled them with stories, and gave them presents (ding ding!).

By the powers that be, “The Asian Grandmothers Cookbook” project serendipitously fell into my lap. What became a labor of love also somehow completed me, filling this childhood void.

Today, I am thankful for all the surrogate grandmothers I met during this amazing journey. These women shared their incredible stories with me, many gave me sage advice in and out of the kitchen, and a few still check up on me once in a while.

Above all, they have given me the most meaningful gifts—their treasured recipes that I will continue to cook for my family and pass on to my children.

~~~

“Many Grandmas'” Asian Pickles

This month, my kind #LetsLunch buddies are posting about grandma recipes in honor of my paperback book launch last month. Unfortunately, I don’t have one of my grandmother’s recipes to share but I decided to come up with a “many grandmas'” quick pickle recipe.

I learned some great pickle tips while working on the book. Grandma Nellie taught me to randomly strip the cucumber of peel for a pretty finish, and to salt the vegetables to draw out moisture and make them crunchier (although I never found much difference). She also showed me how to feather the edges of the cucumber so the pieces can absorb the brine chop-chop. (Slicing the cucumber paper-thin as I’ve done below has the same effect). And Grandma Ling used maple syrup (instead of the prepared ginger syrup she was used to back home) to sweeten her brine. Yet another grandma massaged her carrot and daikon sticks before pouring the brine over.

So here is my quick pickle recipe lassoing tips, tricks and ideas learned from all the grandmas (including my mum who is grandma to my son) in my life together with my own adaptations.

Time: 15 minutes plus standing and brining
Makes: 1 pint

2 large seedless cucumbers (European or Persian cucumbers would be lovely too)
1 medium carrot
Salt
1/2 cup rice vinegar
1/2 cup water
1/4 cup sugar
2 tablespoons maple-flavored agave syrup (I used *Wholesome Sweeteners brand. You can also use maple syrup, regular agave syrup or honey, but start with less and adjust the amounts to taste)
1 clove garlic, smashed
Pinch crushed chipotle chilies

Halve each cucumber lengthwise. Place one half flat-side down on your cutting board, and using a vegetable peeler (a ‘Y’-peeler works great), slice the cucumber lengthwise into paper-thin strips. Repeat with the rest of the cucumbers.

Peel the carrot. Using a lemon zester, make nicks at equal intervals down the length of the carrot. Slice the carrot crosswise into thin slices. The slices will look like flowers.

Place the vegetables in a colander and toss with 1/2 teaspoon salt. Let them sit over the sink while you prepare the brine. (Skip this step if you’re in a hurry. I don’t find much different if you don’t salt the veggies first).

In a small bowl, mix together the vinegar, water, maple syrup, sugar, ¼ teaspoon salt, garlic, and chilies. Microwave on medium-high for 30 seconds. Stir the brine, making sure all the sugar has dissolved. Taste and adjust the seasonings if desired. Go read a chapter in a book while you let the brine cool.

Rinse the vegetables and shake dry. Toss them into the bowl with the brine, mix well and chill for at least one hour. Serve with fried rice, noodles, or munch on it throughout the day. This is a great snack if you’re pregnant too!

*I didn’t purchase the Wholesome Sweeteners maple-flavored agave syrup but I use it because I like it, not because it was free.

~~~

This post is  part of #LetsLunch, our monthly Twitter-inspired food bloggers potluck. This month it’s a tribute to grandmas and their recipes.

Don’t forget to check out the Let’s Lunchers’ creations below (the list will be constantly updated). And if you’d like to join Let’s Lunch, go to Twitter and post a message with the hashtag #LetsLunch.

Charissa‘s Apple, Pecan & Raisin Gluten-Free Depression Cake at Zest Bakery

Cheryl’s My Tanglin Ah-Ma’s Gambling Rice at A Tiger in the Kitchen

Emma‘s Irish, Polish & Korean Grandmothers’ Recipes at Dreaming of Pots & Pans

Jill‘s Stuffed Cabbage at Eating My Words

Karen‘s Semifreddo at GeoFooding

Linda‘s Taiwanese Oyster Omelet at Spicebox Travels

Lisa‘s Polish Potato Cake at Monday Morning Cooking Club

Lucy‘s Grandma Kitty’s Biscuits at A Cook and Her Books

Renee‘s Chinese Grandmother’s Tofu at My Kitchen And I

Triggering Taste Memory with Purple Rice Pudding

Gorgeous black grains are transformed into a luscious burgundy pudding

There’s rice pudding and then there’s rice pudding.

Or more precisely, my rice pudding: “my” being yours, mine, or Uncle Bob’s.

Ask just about anyone and you’ll probably get an earful about a “secret” ingredient, or a tale inextricably linked to the memory of their childhood (or perhaps adulthood) rice pudding, be it seeds scraped straight from the vanilla pod or an emotional recounting of their six-year-old self standing by the stove watching mom stir rice and milk into a whirlpool of thick, creamy custard.

I’m no different.

When I first spied Maria Speck’s Purple Rice Pudding with Rose Water and Dates recipe (Ancient Grains for Modern Meals, Ten Speed Press, 2010), I was overwhelmed by the taste memory of bubur pulot hitam (black glutinous rice porridge) swirled with smooth, velvety milk still warm from the first squeeze of freshly-grated coconut flesh. The result: a burgundy bowl of sweet bliss.

Ah, the power of comfort food! Just one whiff or taste (or the mere imagining) is enough to spotlight a singular emotion or event amidst the jumble of memories and thoughts that are churning in our minds day after day, year after year.

Dusty Springfield’s “The Windmills of Your Mind” from the soundtrack of the original “The Thomas Crowne Affair” started playing in my head in stereo.

Like a circle in a spiral
Like a wheel within a wheel
Never ending or beginning,
On an ever spinning wheel
As the images unwind
Like the circles that you find
In the windmills of your mind

I can’t say for certain what it was about Maria’s recipe that triggered my memory. Perhaps it was the Forbidden Rice, an heirloom black rice variety trademarked by Lotus Foods. During Ming Dynasty China, this medium grain rice was reserved for the Emperor to ensure good health and long life. I’m not one to resist the thrill of an illicit ingredient.

Find Forbidden Rice and other Lotus Foods rice products at Whole Foods Market

Plus, the rice reminded me of black glutinous rice, the grain used to make pulot hitam. Uncooked, black glutinous rice and Chinese black rice are almost identical. After a spell on the stove, black glutinous rice huddles together and transforms into a chewy, almost gummy (but not in a bad way) porridge. Forbidden rice is more toothsome and the individual grains hold their shape better.

Once I started making the dish, I literally started tearing as I doused the chopped dates in the fragrant liquid. The fragrance transported me to my childhood kitchen where on the refrigerator’s topmost shelf always sat a bottle of rose syrup, far out of the reach of prying little hands. As a little girl, ambrosia was defined by one part rose syrup and four parts water served in a tall glass. Alas, this was a drink mainly served to guests. Only once in awhile, my brother and I were given a glass as a special treat.

Rose syrup is not to be mistaken for rose water. Or for that matter, a natural product infused with the essence of rose petals. It was (and probably still is) made with artificial flavoring and coloring, clearly, since just one glassful left my tongue stained a deep crimson.

No matter the source, memory is both a marvelous and precious thing. And just like Dusty sings, “Never ending or beginning, on an ever spinning wheel” our memories are in constant flux. But rest assured the images will always unwind in the “windmills of your mind.”

~~~

Purple Rice Pudding with Rose Water Dates

A food writer friend once said that he wouldn’t let chefs test his recipes because they couldn’t follow directions and always wanted to add their own spin. I’m not a chef but I’m guilty as charged. While it is difficult for me to follow a recipe to a ‘T’, I ended up giving this one just a mini makeover. Amidst claims that I am in denial about my lactose intolerance, I used coconut milk instead of half-and-half to nudge it closer to the rice pudding I own kinship with. And in place of the cinnamon stick, I sprinkled ground cardamom as an ode to my favorite kulfi flavor–rose water and cardamom.

Makes: 4 servings
Time: 30 minutes

1 1/4 cups water
1/2 cup Chinese black rice
1/4 cup finely chopped pitted dates (about 6)
2 dates, pitted and cut into thin strips
4 teaspoons rose water, divided
1 1/4 cups coconut milk (slightly less than one 13 oz can)
2 tablespoons palm sugar or brown sugar
Pinch of sea salt
1/2 teaspoon ground cardamom or 2 cardamom pods
1/2 teaspoon vanilla extract

In a small saucepan, bring the water and rice to a boil. Lower the temperature to maintain a simmer, cover, and cook until the rice is tender yet still slightly chewy, about 30 minutes. Some water will remain (do not drain).

While the rice is cooking, prepare the date topping. Place the chopped dates in a small bowl and drizzle with 2 teaspoons of the rose water. Add the date strips to a different small bowl and drizzle with 1 teaspoon rose water. Stir the dates in both bowls and set aside, stirring once or twice more.

Add the remaining 1 teaspoon rosewater, coconut milk, sugar, salt, cardamom, and vanilla to the rice. Raise the heat slightly until the mixture starts to bubble, stirring several times. Lower the heat to maintain a gentle bubble and cook, uncovered, for 15 more minutes, stirring every few minutes or so. The consistency should be creamy yet soupy — the mixture will thicken as it cools. Remove the saucepan from the heat and remove the cardamom pods if using. Stir in the chopped dates.

Divide the rice pudding among small individual dessert bowls or cups. Garnish with the rose water-infused date strips, and serve warm or at room temperature.

Notes:
Maria recommends choosing firmer dates such as Deglet Noor that won’t turn to mush in the pudding. To lighten up the pudding, she also suggests using whole milk instead of half-and-half. In the same vein, you can use light coconut milk.

~~~

This music-inspired (well kinda) post is part of the Twitter #LetsLunch bunch. Here’s what the rest of the crew is raving about:

Tiger Cakes ~ from Ellise at Cowgirl Chef
Honey Mac Wafers with Coconut ~ from Lisa at Monday Morning Cooking Club
Tommy’s Chili ~ from Felicia at Burnt-out Baker
Banana Bread ~ from Rashda at Hot Curries and Cold Beer
Chicken and Dumplings ~ from Cathy at ShowFood Chef
Quiet munchies for concert-going ~ from Patrick at Patrick G. Lee
Coconut Cake ~ from Steff at The Kitchen Trials
Cuban black beans ~ from Linda at Spicebox Travels
Gluten-free Thin Mints ~ from Linda at Free Range Cookies

Tex-Mex Like You’ve Never Tasted Before–Miso Chili Con Carne y Wasabi Sour Cream

As un-American as it makes me sound, I never make chili con carne, or chili for short. In fact, I’ve probably eaten only 4 or 5 bowls of it in my lifetime. I know, I’m ashamed to say it.

To me, chili refers to the red or green finger-shaped fruits that add spice and heat to the many dishes of my childhood.

Chili as a piping hot bowl of cumin-scented ground meat, beans, tomatoes, and spices topped with sour cream and shredded cheese is an American incarnation I am slowly coming to terms with.

Needless to say, I was a little stumped when I was asked to join the Let’s Lunch group, a Twitter-inspired virtual lunch date organized by Cheryl Lu-Lien Tan, author of “A Tiger in the Kitchen” (it’s a great read about Tan’s journey of discovering her Singaporean family and culture through food), and I discovered that the dish of the month was chili!

I was determined to “Asianify” this Tex-Mex staple. It’s been done before. Zengo, a Latin-Asian fusion restaurant with locations in Denver and D.C., marries chipotles with miso, achiote and hoisin, and adobo and sesame. And who hasn’t used Serranos or jalapeños in their Asian cooking?

As I rummaged through my fridge I found some white miso. Miso is similar to Chinese yellow or brown bean paste which is used in mabo tofu, a dish of ground pork, tofu, and chilies. I decided to use this as a launching pad to create a chili recipe with my name on it.

Miso Primer

miso smiley face
How do you like my miso smiley face?

Miso is a salty paste fermented from soybeans, salt and/or rice, barley. A concentrated form of protein, it has live active cultures (i.e. lactic acid-forming bacteria) that aids digestion. Miso adds robust umami flavor to soups, sauces, and meat marinades.

Here are some more common misos in order of light to dark-colored, delicate to strong-flavored:

Saikyo: Lightly fermented, this cream-colored miso is naturally sweet with a delicate flavor. Sometimes used to flavor sweet baked goods.

Shiro (commonly called white miso): A straw to gold-colored miso that’s low in sodium. It’s also the most versatile of the lot.

Aka (commonly called red miso): The longer ageing process (compared to shiro) produces a deeper, more savory miso with a reddish hue.

Hatcho: Soybeans and salt are fermented for two years in cedar barrels to produce this dense, chocolate-colored paste. Its intense, meaty savoriness is perfect paired with meat.

For the most part, you can use any type of miso in any recipe.

When I was researching “The Asian Grandmothers Cookbook,” Hiroko Sugiyama, a Japanese culinary instructor based in the Northwest  told me she likes to combine red and white misos when making miso soup to make it more interesting. (If you have my cookbook, it’s on page 90.) You can also buy awase miso which is a blended miso.

Even a bowl of chili could do with a dash of umami!

~~~

Miso Chili Con Carne y Wasabi Sour Cream

IMG_1967

Don’t get hung up on the type of miso to use in this recipe. My organic miso was labeled “White Type” and contained both rice and soybeans. More importantly, look for just the basic ingredients without any additives. Whatever type of miso you use, you’ll end up with a rich, umami-laden stew that will impress your friends at your upcoming Super Bowl party.

Time: 1 hour 15 minutes (15 minutes active)
Makes: 4 to 6 servings

1 pound/500 grams ground pork
1 small onion, chopped (1/2 cup)
2 cloves garlic, minced
2 tablespoons miso (white or red) mixed with 1/4 cup warm water to make a creamy paste
1 (28 oz/794g) can chopped tomatoes
2 cups (1 (16 oz) can/500g) cooked beans (adzuki, pinto, kidney)
1 cup roasted corn
1 teaspoon paprika
1 teaspoon cumin
1 teaspoon oregano
1 teaspoon cayenne pepper (optional)
Salt and pepper to taste

Wasabi Sour Cream (see below), shredded cheese, and green onions to serve

Brown the pork in a large Dutch oven over medium-high heat to render the fat, about 5 to 7 minutes. Drain the fat and remove the meat to a plate.

Using the same Dutch oven, add 1 teaspoon of olive oil and cook the onion and garlic over medium heat until fragrant, about 30 seconds.

Return the pork to the pot. Add the miso mixture and mix well. Add the tomatoes, beans, corn, spices, plus 1 cup water. Mix well and bring the chili to a boil over medium-high heat. Reduce the heat and simmer, covered, for at least 1 hour. Stir occasionally and add water if the chili looks like it’s drying out.

Taste, and add salt and pepper, and/or more spices as needed. I didn’t add any salt because I found the miso added enough saltiness.

Serve in individual bowls and top with wasabi sour cream, cheese and green onions.

As with any stew, this chili tastes even better the next day, or even the day after!

Wasabi Sour Cream
Admittedly, the wasabi sour cream adds more fun than flavor to the chili, you hardly taste the wasabi. The proportions below produce a pretty mild result. If you prefer, continue adding wasabi powder and tasting as you go until you feel a jolt up your nose.

2 teaspoons wasabi powder
1 cup sour cream

Whisk the wasabi and sour cream together in a small bowl and refrigerate until ready to use.

~~~

Don’t forget to check out the Let’s Lunchers’ chili below. And if you’d like to join Let’s Lunch, go to Twitter and post a message with the hashtag #Letslunch.

Cheryl‘s Keema Chili at A Tiger in the Kitchen

Cathy‘s Chunky-Style Cowboy Chili at Showfood Chef

Charissa‘s Clean Out Refrigerator Night Cassoulet, A “Frenchified” Chili at Zest Bakery

Ellise‘s Chicken Tinga Chili at Cowgirl Chef

Emma‘s Dave’s Chili at Dreaming of Pots and Pans

Felicia‘s Low-Concept Vegetarian Chili at Burnt-Out Baker

Grace‘s Chinese New Year Chili at HapaMama

Karen‘s Hawaiian Chili at GeoFooding

Linda‘s Smokin’ Hot Vegan Vaquero Chili at Spicebox Travels

Lucy‘s “Full of Beans” Chili at A Cook And Her Books

Joe‘s Texas Bowl O’Red at JoeYonan.com